
As promised, I’m back with a fun new project! However, it’s not actually the project I mentioned in my last post, though it is a fun, colorful, new Pinterest project that I made in the last two weeks, and it does include recycled materials and involve home decor, so I guess it kind of fits the entire description I previously gave. But, I’m all about honesty here so I wanted to say that I’m still working on the original project I mentioned, which turned out to not be quite as easy as I thought it would be. Oh well, I’m sure I’ll have something to post soon. For today I’m here to post my latest exploration in the land of succulents, an adorable little planter featuring a woven plastic bead exterior.
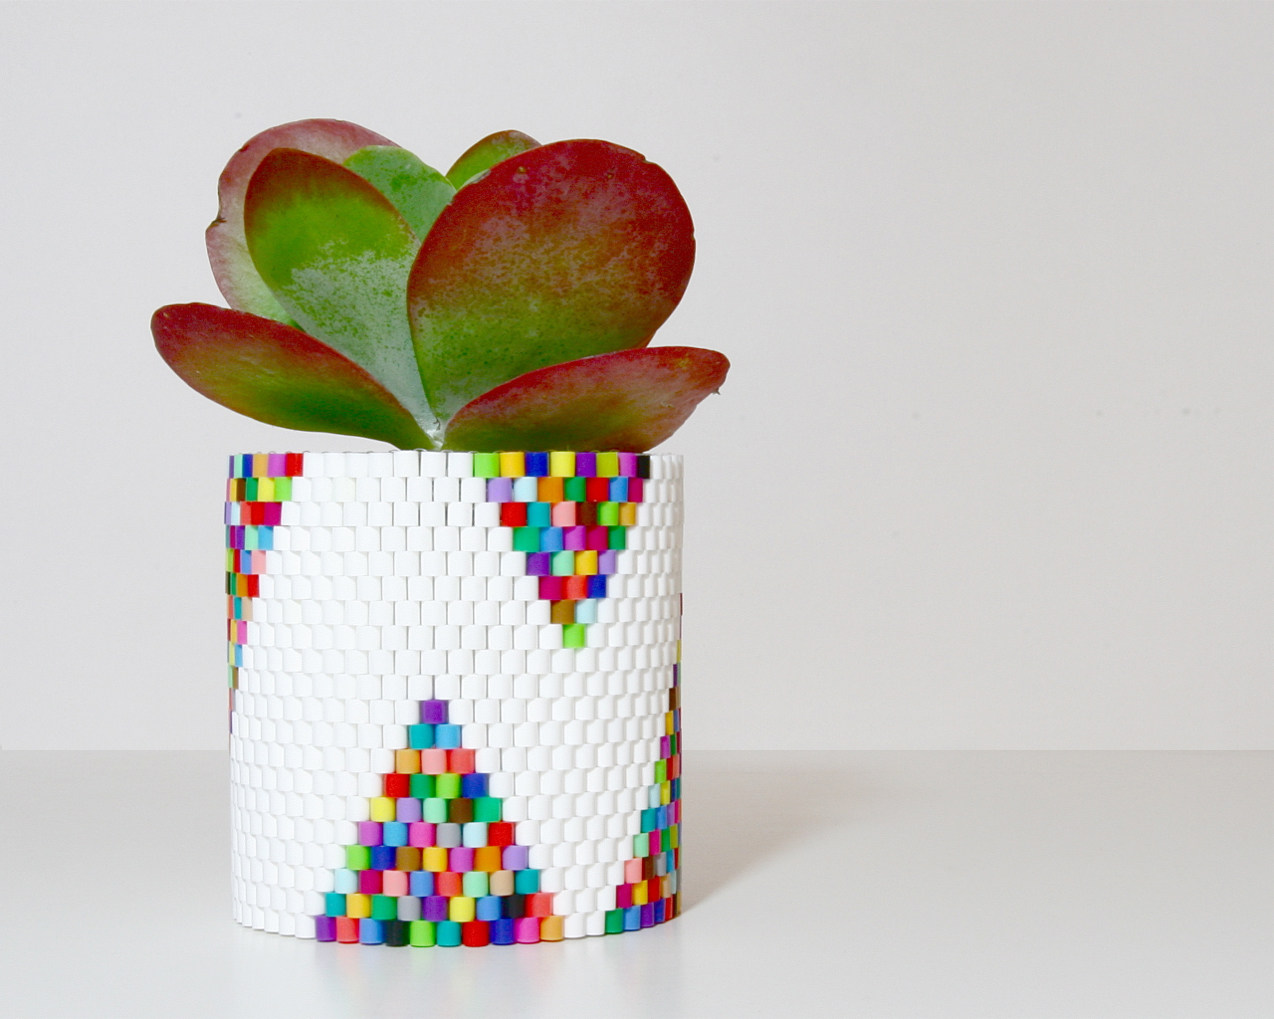
As I said, this is a Pinterest project and I couldn’t be more excited about it. The original inspiration came from two places, both featuring beautiful plastic Hama (or Perler) bead weaving projects. The first were these beautiful woven tea candle holders. They caught my eye first, which lead to me doing some more Pinterest research into Hama bead weaving on its own, which is when I came across these stunning hanging plant pots by Peaches + Keen. As you can probably tell, I really fell in love with their white planter with the colorful triangles and decided I really wanted to replicate it myself!
For the original Peaches + Keen planters they used a glass insert for planting their succulents, but I know how heavy my mason jar hanging planters are and I wasn’t sure I wanted something that heavy in the end. So that is when I came up with the idea to use the round plastic containers that Talenti Gelato comes in. First, if you haven’t tried their gelato it is really really scrumptious. Second, their containers are super useful for storing things! I found out pretty early on that they are the perfect diameter to hold the paper circles that I use for my artichoke lights. And a million other things. I probably have about 30 of them in my apt storing different things (and no I didn’t necessarily eat all that gelato myself, I think my dad may have saved one or two for me, maybe. Ok, so maybe I DID eat all that gelato myself, but it was over a few years, or, well, at least ONE year.) And it turns out, they make an awesome planter too!

Ok, so I want this to be a DIY post so I’ll do my best at some step by step instructions. First, the bead weaving part. You basically weave a bracelet/donut and then just slide it onto the outside of your container. I’ve seen other Pinterest posts where people put them on mason jars, they would also look cute on recycled tin cans to use as pencil cups. Ooh, I just thought of that, and now I really want to make some pencil cups like that! Anyway, I get side tracked. So the bead weaving part. First, you need the small plastic fuse beads that I know I used a ton of when I was a kid. It looks like they are sold under two brands, Hama and Perler, though I also saw a bin of them from IKEA in a post somewhere, so you can probably buy any brand. I purchased some bulk lots of just plain white, and then a big bin of multi-colored. I think in the tea light blog post the designer used thin elastic, or maybe just thread, which would both work equally well. Personally, I just used really thin fishing line that I happened to have. It actually has a bit of stretch which works perfectly for getting the final donut around your object. Ok, now I’m going to do my best to make a step by step tutorial, but you all know I can be long winded so they might be slightly chunky steps… I’ll try to keep it simple.
1. Cut a length of your fishing line/thread. I usually found that a piece about a yard long worked well, it was long enough to last for a number of rows, but not too long to get continually tangled. It doesn’t really matter how long your piece is, when you reach the end you can just knot a new piece onto the end and continue weaving, the knot will be hidden inside the beads at the end.
2. Take your piece of fishing line and knot one end to your first bead. I then chose to knot the other end to my needle, because with fishing line its pretty easy to open up single knots and without the knot it would keep sliding out of the needle. You might skip this step if you use thread.
3. Add an entire row of beads, equal to the final height you want your woven piece to be. There are varying instructions out there, but I found it much easier to use an EVEN number of beads. If you want to use an ODD number of beads because that matches your height requirements better, go to the tea candle project and she links to a tutorial that uses an ODD number of beads. I tried it first and found it trickier, especially with the fishing line, so restarted with an EVEN number, but it’s up to you. I found my gelato jar was 20 beads high, so I started by adding 20 beads.
4. Add the first bead of your second row. Now here’s where it gets a bit tricky, you are going to now thread your needle back through the second bead down, skipping over the first bead. You will keep repeating this until you get to the end of your row. Add a bead to your thread, skip a bead in the first row, and thread your needle through the next bead. I’ve included a simple little diagram that I hope helps give you the idea. 
5. When you get to your third row you’ll notice that half your beads stick out a bit, those are the ones you’re threading through for this step.
**Note: I originally started at a friends house, sitting on the couch with the project in my lap. That was a BIG mistake. I found it much MUCH easier when sitting at my desk, so I could keep the beading flat on the desk in front of me. It just keeps things flat and organized, and makes figuring everything out much easier. I also found it worked best for keeping my fishing line from getting tangled. I kept flipping my piece around so I was always threading right to left, and I would only pull my needle through a little bit until I got to the very end, then I would place one hand on the weaving to keep it flat and pull the string carefully through the entire row with the other hand. This meant the loose fishing line was usually just hanging off my desk in a long loop, until I pulled it through. This also meant I could use longer pieces of fishing line (as I got better with practice) without it getting tangled. Start with a shorter piece at first though, until you get the hang of it.
6. Keep weaving, making any pattern that you want, until you have a strip that is long enough to wrap all the way around your container. You might need to hold it up a few times at the end to figure out how long to make it.
7. Add your last row of new beads. This row will need to fit together with your first row, so after you add your last new bead you’ll need your thread to be coming out of the opposite side of the weaving from where you first started. This is because you are now going to weave together the two ends of your strip, just as you’ve woven together all the other rows just without adding new beads. Every time you normally would have added a bead, instead thread your needle through one of the beads from the first row. This may sound tricky in words but it should be really self explanatory when you get to the end.
8. If you used fishing line and you can easily untie your original knot, great! Untie it and take the two loose ends of your fishing line and carefully knot them together. If you used thread and can’t get your knot out, no worries. Simply use the tail of the thread to tie a knot with the loose end you have. Trim the tails of the thread or fishing line and you can somewhat tuck the knot up into one of those first or last beads to hide it.
 9. You should now have a beaded donut! Or bracelet, large, chunky bracelet. Now you’re ready for your planter. Because I was focused on keeping everything light weight, I had purchased some chunky silicon rock-like things at Michaels to use instead of real rocks at the bottom of my jar. I think they are used for wedding candles or vases or something. It doesn’t really matter what you use, but it is very important that you put something chunky at the bottom of your container, especially because there’s no hole in the bottom to drain excess water. This way the water can fill in around the rocks but away from the soil. Add a good layer at the bottom, 1 inch at least. This is especially important for succulents because they are part of the cacti family and like to be able to dry out.
10. Now you just need to add your plant. I purchased a cute little succulent that was in a pot just the exact diameter of my container. But you can always add extra soil to a smaller plant. I found it was helpful to do the planting before I added the beading to the outside, just to keep things cleaner.
11. With my Talenti jars I realized that because there was a lip near the top with threading for the cap, when I put my beading around the outside it bulged near the top which I didn’t like. So I cut a piece of felt that was tall enough to go from the bottom of the jar up to the lip, and long enough to wrap around exactly once. I used a bit of double stick tape to hold it in place. This evened out the lower part of my jar and brought the exterior sides flush with the lip. At the top I found the threaded pieces kept the overall beading pushed out enough that it looked flush. Which was good because I wasn’t sure I wanted felt up near the top of the jar where it might get wet. I’m very wary of using materials that could mold or rot anywhere near water.
12. Finally, carefully slide your bead sleeve over the container, from the bottom so you don’t disturb your plant. And you’re done! Well, you’re done with what I made. If you wanted to have your planters hanging like in the inspirational image you’ll need to add string of some sort. I’m not quite sure the best way to do this, but at some point the string will probably have to wrap under the jar, in order to take the weight of the plant. The good news is that between the plastic jar, plastic beads, and plastic rocks at the bottom, the whole planter is really light weight so it probably wouldn’t need anything too crazy to get it hung up.
 Thanks for hanging in there with my slightly long winded tutorial, hopefully all the steps make sense! If you have questions, or try out your own version, please let me know in the comments section, I always love to see what my readers make!
Have a lovely holiday week, whatever your religious preferences. I, personally, will be celebrating a relatively secular Bunny day on Sunday, with hopefully at least one piece of chocolate, my favorite part of Easter.
Ciao! Allison

It’s beautiful!
Thank you! I was so excited I’ve already made a second one, and have ideas for a third! If I make more I’ll do a follow-up post to show some of the other designs I have made.
That would be fun.
Pingback: Paasactie #17 » Veetje
Gorgeous!
Pingback: 53 Tin Can Crafts - Do Small Things with Love
Pingback: Woven Planter Update | the 3 R's blog
Pingback: Decora con Hama beads
Pingback: Perlegal | Kaostroll
This is the peyote stitch done with large beads and I love the pattern.
Pingback: Woven Bead Planter | Do It Daily
Pingback: Before You Recycle Them, Make One Of These 18 Adorable Tin Can Crafts – Vanuatu Times
Pingback: Viral Stories » Viral Stories » Before You Recycle Them, Make One Of These 18 Adorable Tin Can Crafts
Pingback: Before You Recycle Them, Make One Of These 18 Adorable Tin Can Crafts
Pingback: Before You Recycle Them, Make One Of These 18 Adorable Tin Can Crafts – The Cutting Trend
Pingback: Before You Recycle Them, Make One Of These 18 Adorable Tin Can Crafts - DNA Odisha
Pingback: Before You Recycle Them, Make One Of These 18 Adorable Tin Can Crafts - Viral Rising - The Most Viral News from Around the Web
Pingback: Before You Recycle Them, Make One Of These 18 Adorable Tin Can Crafts – Buzzarious
Pingback: Before You Recycle Them, Make One Of These 18 Adorable Tin Can Crafts - Realizing Design
Pingback: Before You Recycle Them, Make One Of These 18 Adorable Tin Can Crafts - Decorating Tools
Pingback: 25 Ways to Convert Tin Cans into Something Beautiful | Home Designing
Pingback: Before You Recycle Them, Make One Of These 18 Adorable Tin Can Crafts | LIFE BUZZ
Pingback: 10 Eye-Pleasingly Vibrant Perler Bead DIYs | Flair Flickers
Pingback: Before You Recycle Them, Make One Of These 18 Adorable Tin Can CraftsBuzzlefeed - Latest News Related To Buzz | Buzzlefeed - Latest News Related To Buzz
Pingback: 25 Ways to Convert Tin Cans into Something Beautiful - DIYJane
Pingback: Before You Recycle Them, Make One Of These 18 Adorable Tin Can Crafts | view3d.tv
Pingback: Succulent Plants: The Hip DIY Trend To Bring Color To Your Home Living
Pingback: Before You Recycle Them, Make One Of These 18 Adorable Tin Can Crafts | Awww So Cute Crafts
Pingback: Before You Recycle Them, Make One Of These 18 Adorable Tin Can Crafts – WOWrly
Pingback: Perler Bead Roundup - A girl and a glue gun
Pingback: Before You Recycle Them, Make One Of These 18 Adorable Tin Can Crafts - Smoking & BBQ
Pingback: 6x dit kun je dus ook met strijkkralen
Pingback: Besten Mode Ideen 16 Einfach und Spaß Frühling Handwerk für Jedermann - Besten Mode Ideen
Pingback: 30 Gorgeous DIY Succulent Planters You Need to Make
Pingback: DIY Woven Planters And Planter Covers - DIY & Crafts | A Matter Of Style
Pingback: 30 Recycled Tin Can Crafts that will Amaze | How To Build It
Its beautiful!! Is there a video how to do this??
So cute,
Could you please add a video instruction ? Very helpful! Thanks.
Hi, thanks for your interest. I don’t make video tutorials, but I’m sure you could find one on YouTube. This is called the peyote stitch, a very standard type of bead weaving.
Hi this is so beautiful imma do it right now. What I don’t right understand is what you do to the bottom. As I understand you put some stones below the plant and that’s it? But then the water will slip through, no? I’d need somethign below to capture it. I thought of some lid or something that I can hide inside. How did you do it?
Kind regards 🙂
Tim
Ah nevermind, I think I got it. You use some jar to beginn with. Thanks anywayyyss
Pingback: 36 {Free} Succulent Container Ideas from Household Things - GoViral
Pingback: 35 Creative DIY Succulent Planter Ideas to Display Succulents
hallo hätte bitte gerne die anleitung schreiben sie bitte zurück